
Installation Instructions
While the JUMPS sensor offers the easiest, most robust installation on the market it is imperative that these instructions are carefully followed to ensure trouble free operation. Damage to the sensor or wiring harness by using the incorrect installation procedure will void the sensor warranty.
These instructions don’t cover opening of the transmission or other associated work, it only covers the sensor installation and calibration procedure. Please go to the Resources page for videos that cover these procedures.
Caution: Replacement of the distance and speed sensor is not endorsed by Porsche nor do they provide maintenance procedures for the process.
1 - Opening the package
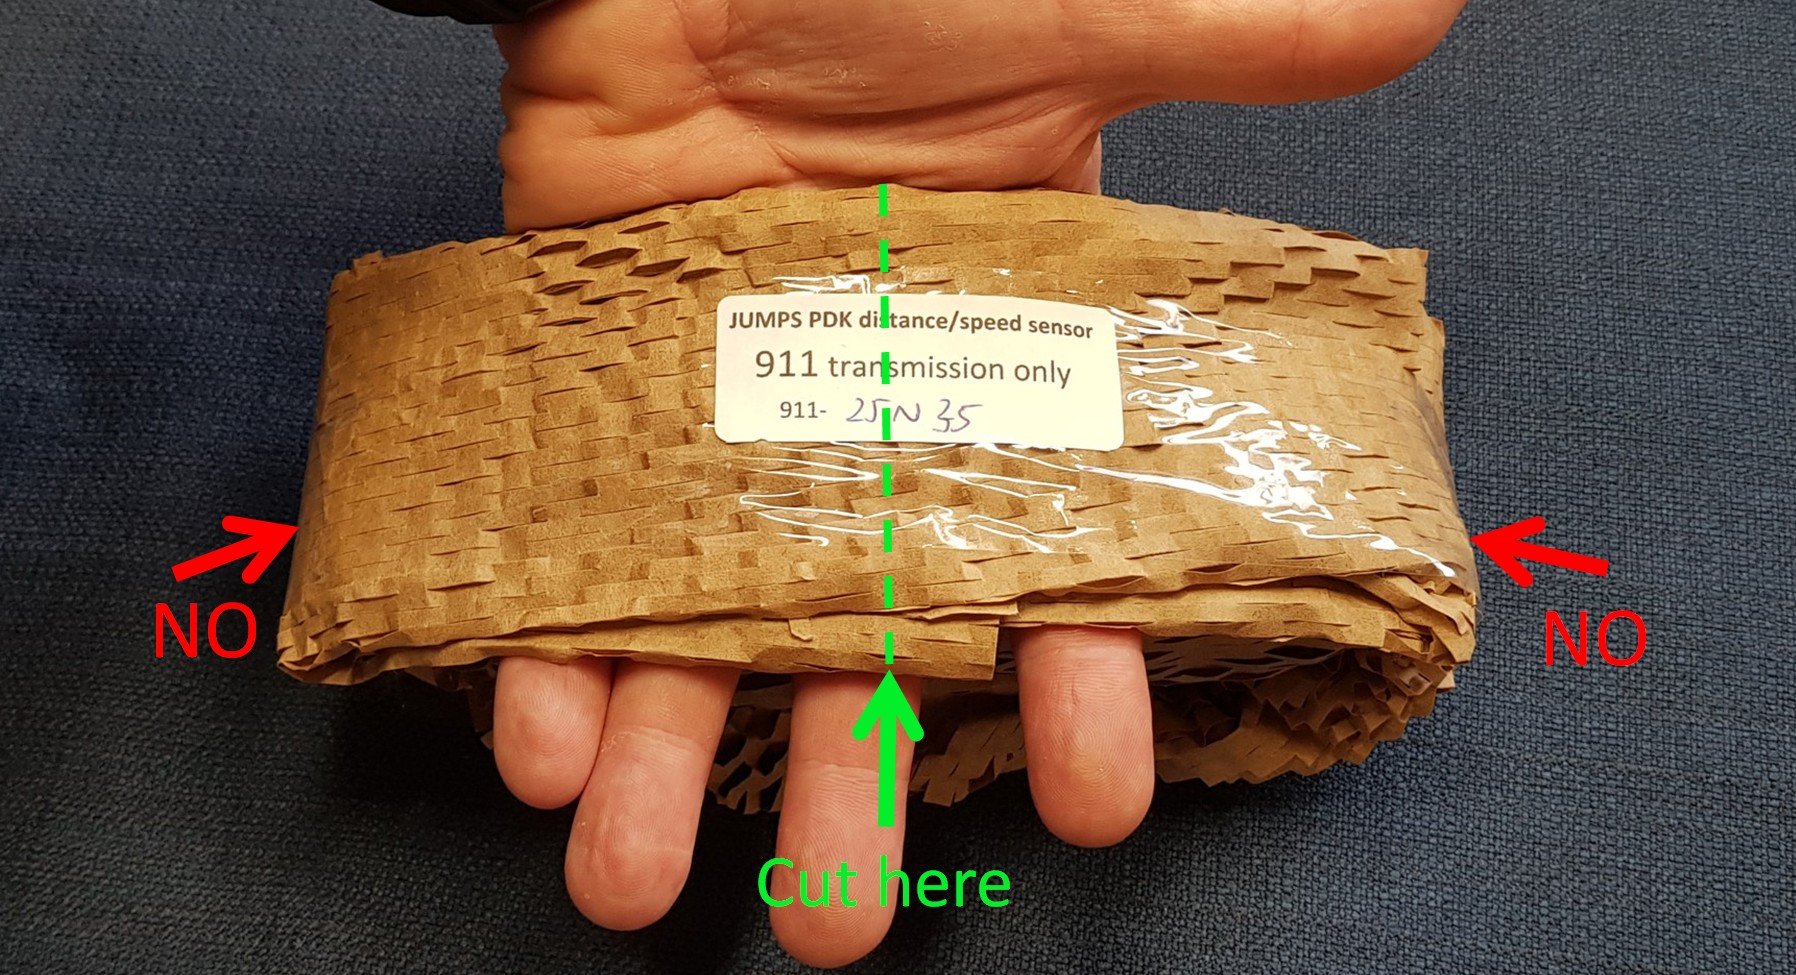
Once removed from the box, find the gap in the packaging directly below the label. Cut through this outer packaging directly through the label as indicated below. DO NOT cut through the ends as this is where the harness wiring is located.
Once cut as shown, open this out and remove the tape. The paper packing can now be easily unrolled to get access to the sensor.
2 - Sensor identification
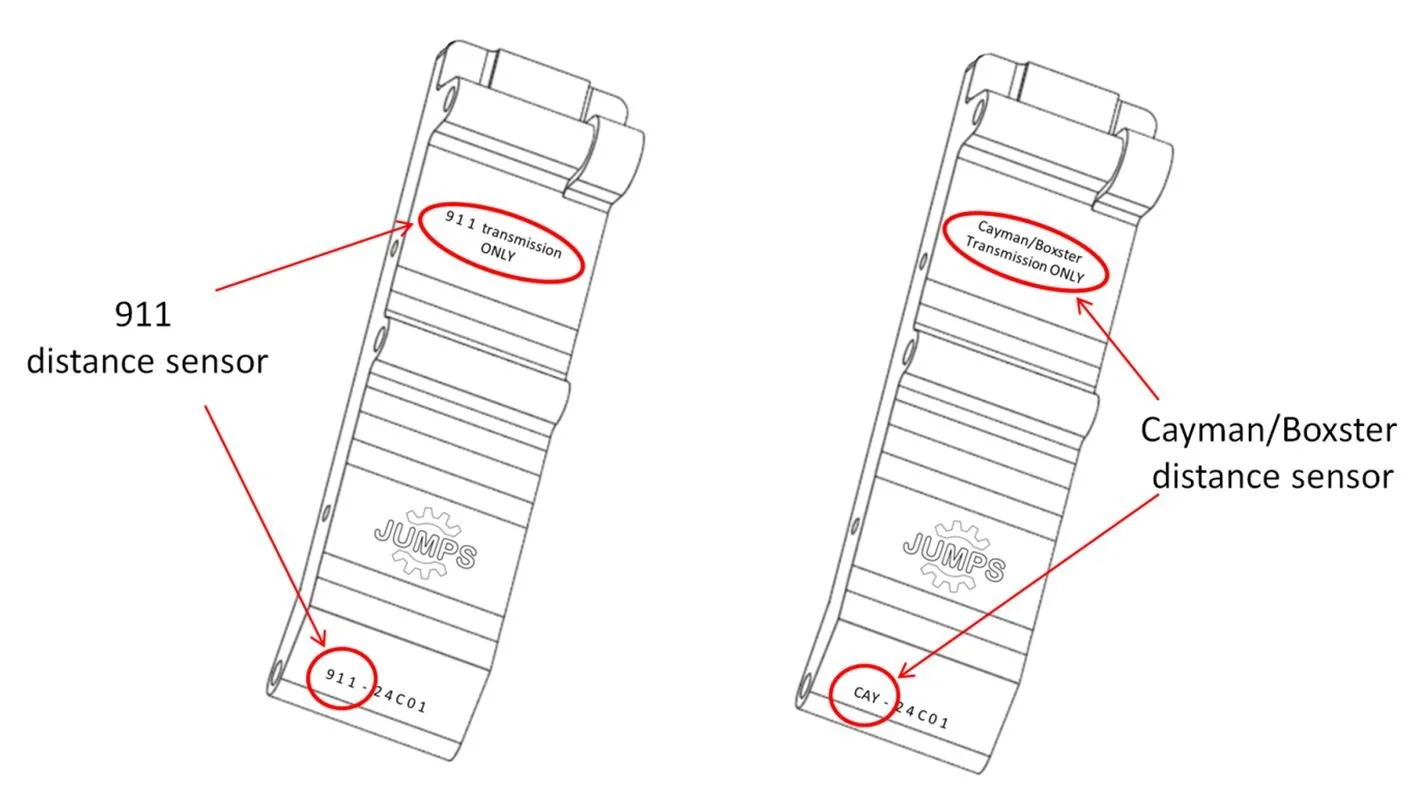
Ensure you have the correct sensor package for your car. Look on the distance sensor for the serial number prefix. The prefix “911” indicates a sensor designed for the 911 (997, 991 or 992GT3/GT3RS). The prefix “CAY” indicates a sensor designed for the Cayman or Boxster (987, 981 or 718).
3 - Checking the sensor prior to installation
Distance sensor testing
Each sensor pack is extensively tested prior to shipment to ensure that there is no wiring or other defects, but if desired the distance sensor can be tested prior to installation to confirm correct functionality. Some of these checks can also be applied on the suspect sensor to validate the diagnosis.
There are three types of checks that can be performed, listed below in order of easiest to most complex.
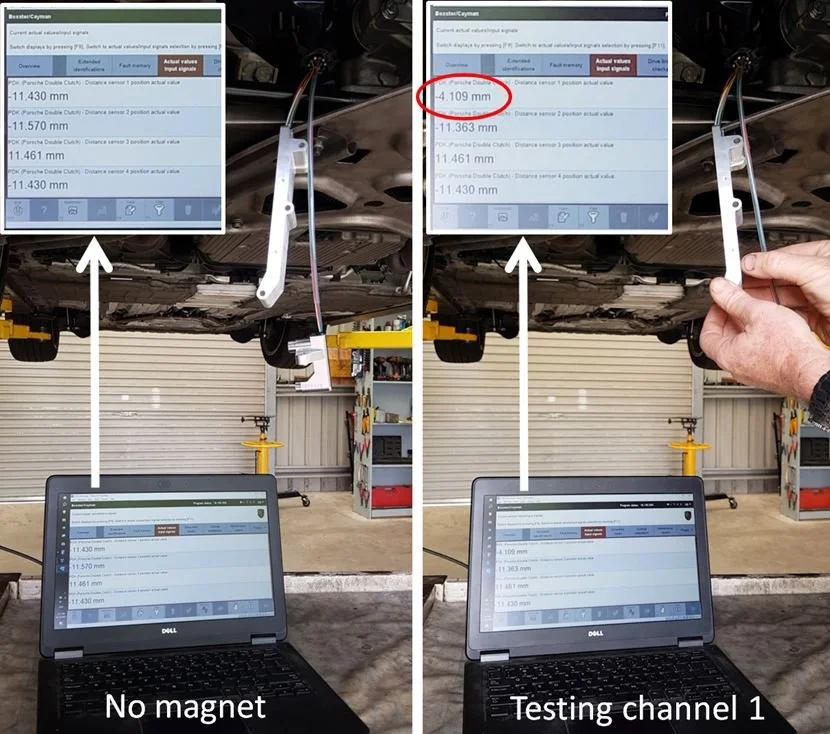
1) With PIWIS connected and monitoring Shift Rod actual values, disconnect the lower transmission plug and connect the new sensor. Each channel should read approximately 11mm (+ or -).
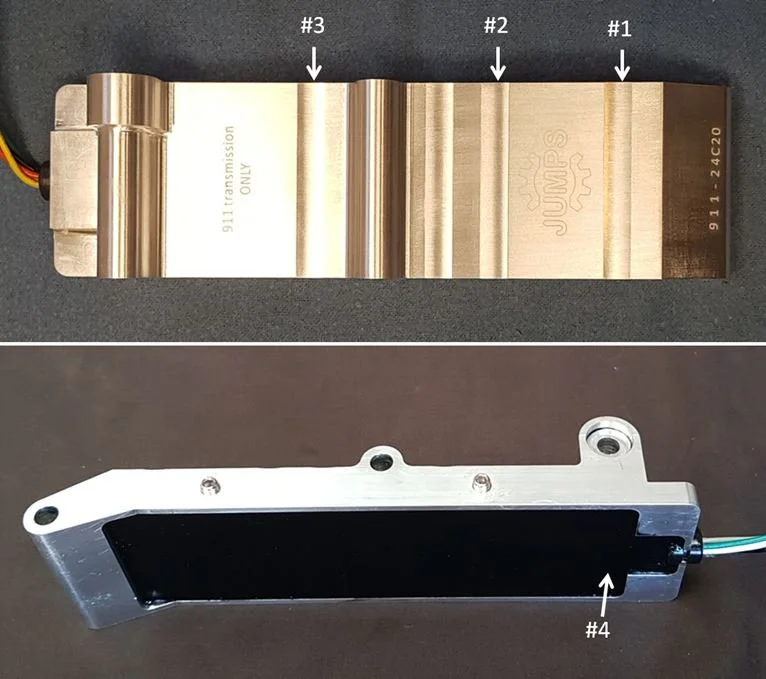
2) Set up per test #1, then take a small magnet and move it just above the sensor and verify a response in the displayed distance. You should see values between approximately +11 and -11mm. The location of each channel is shown in the image on the right.
Note: The magnet polarity needs to be correct. If there is no response the magnet may need to be flipped over.
3) After installing the sensor, but before putting the case back on, connect PIWIS and display the Shift Rod actual values. All four distance sensor channels should read less than 1.5mm (+ or -) with all four shift rods in the central position.
Note: If the transmission has been removed from the vehicle it is possible to conduct these tests, but a break-out cable will be required.
Speed sensor testing
Basic testing of the speed sensor output can be done by observing the PIWIS fault codes and ensuring there are none related to the speed sensor. This means the baseline signal being sent by both speed sensor channels is being received by the TCU.
Complete testing of the speed sensor requires the transmission input shafts to be turned. Whilst observing PIWIS display Shaft Speed actual values, rotate each shaft and watch for a speed response. This is an advanced procedure and should only be attempted by those who are very familiar with the transmission.
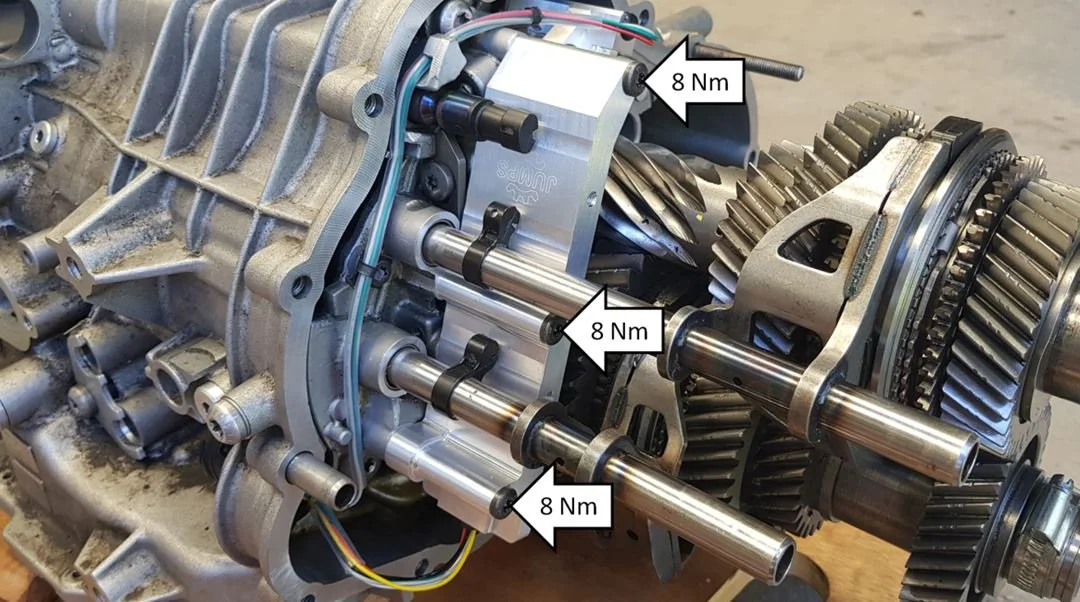
Mount the distance sensor and gently hand tighten all three screws. Then torque to 8 Nm (70 lb-in) starting at the center screw.
4 - Installing the distance sensor
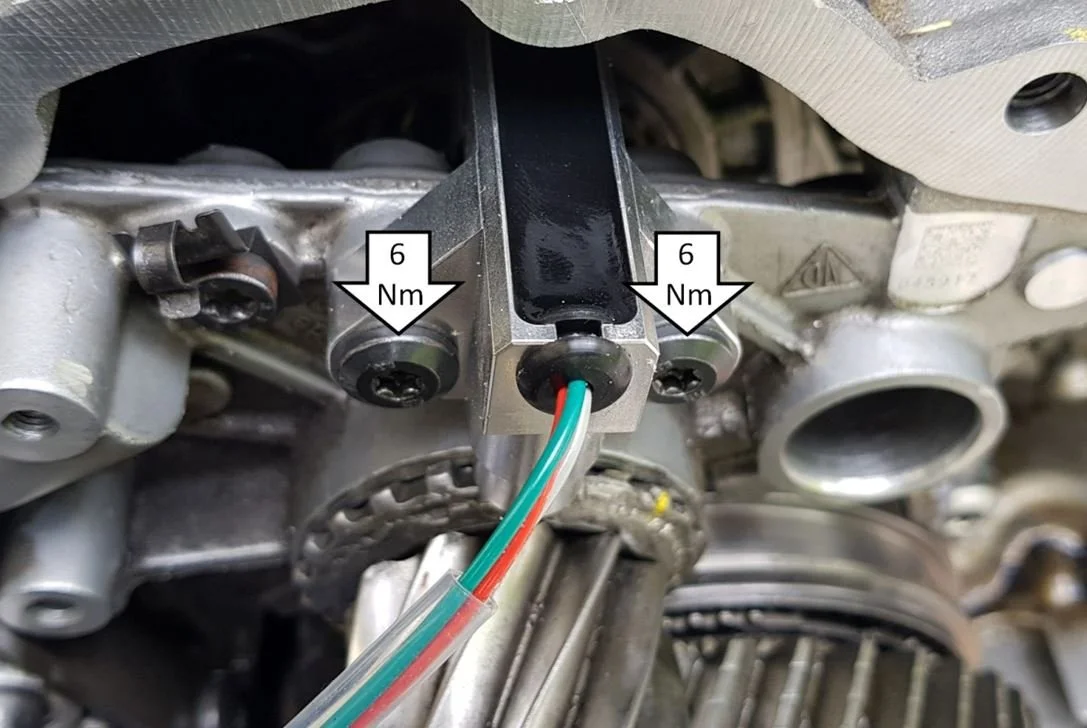
5 - Installing the speed sensor
Mount the speed sensor and gently hand tighten both screws. Then torque to 6 Nm (53 lb-in).
6 - Routing the wire harness
Critical: Please follow the instructions below carefully by installing the wiring in the specified numbered order. A number of installers have damaged the wiring due to not following these procedures correctly.
Installation errors will void the sensor warranty.
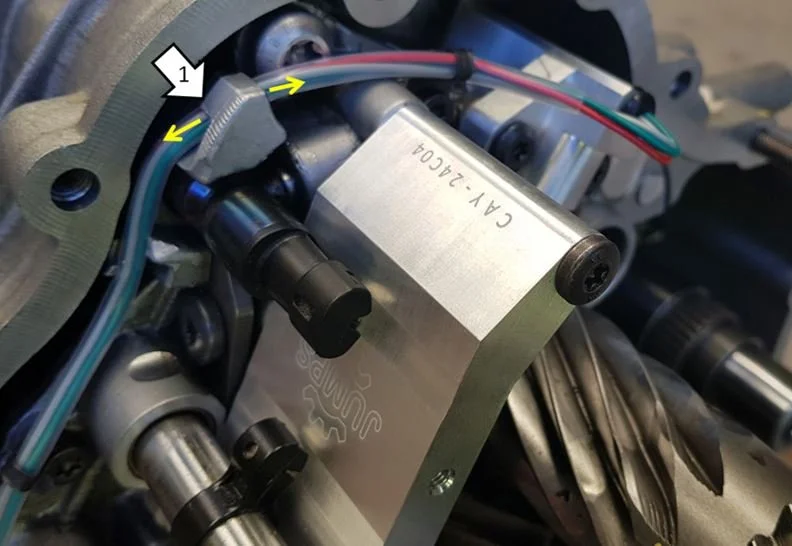
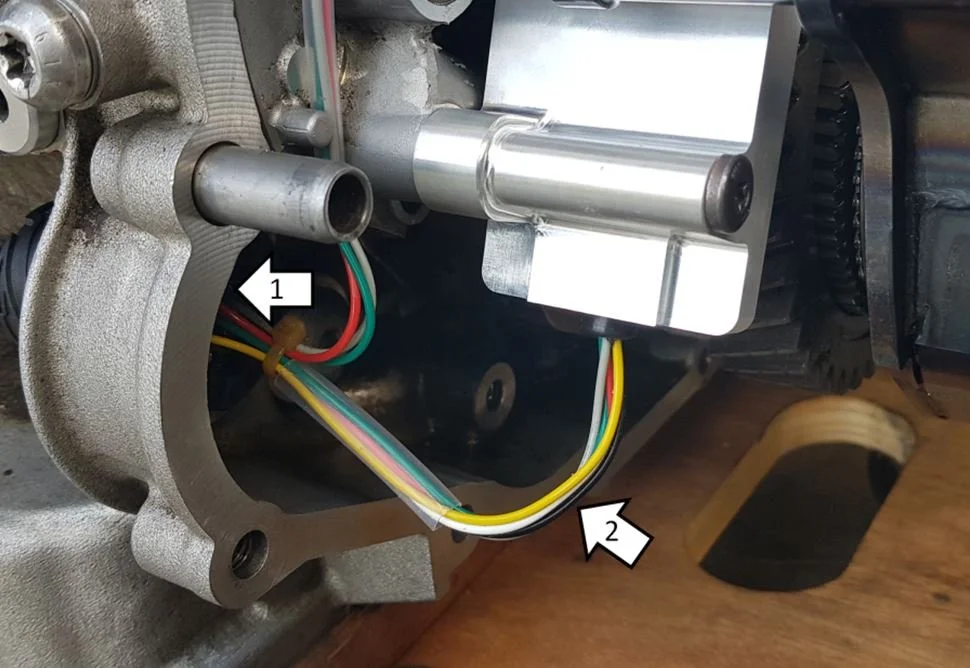
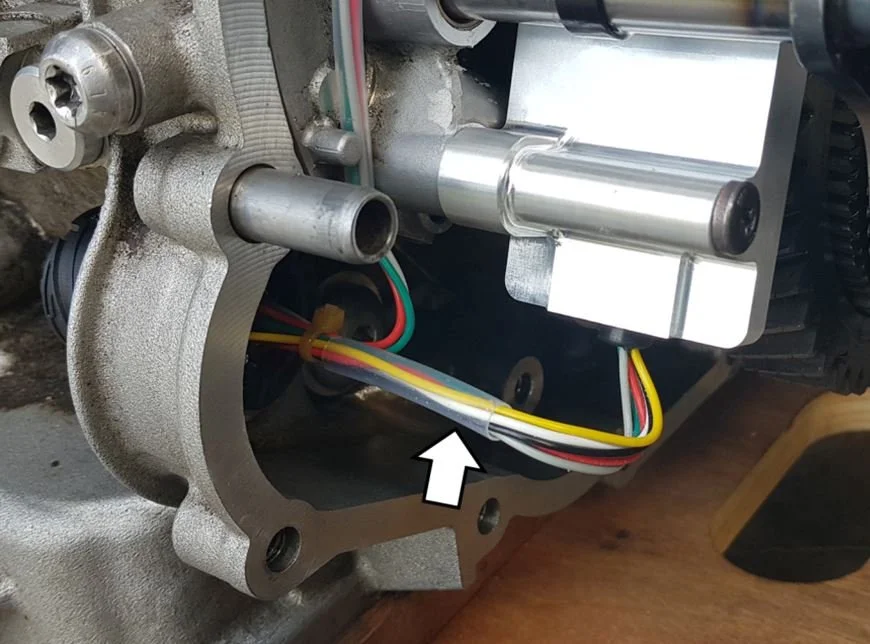
Push the protective tube behind metal hook at 1. Once in place the tube and wires can slide easily to position it correctly (yellow arrows).
Push the tube into the metal clip at position 2 ensuring the tube end extends no further than the speed sensor edge at 3. The wire bend radius should look as shown at 4.
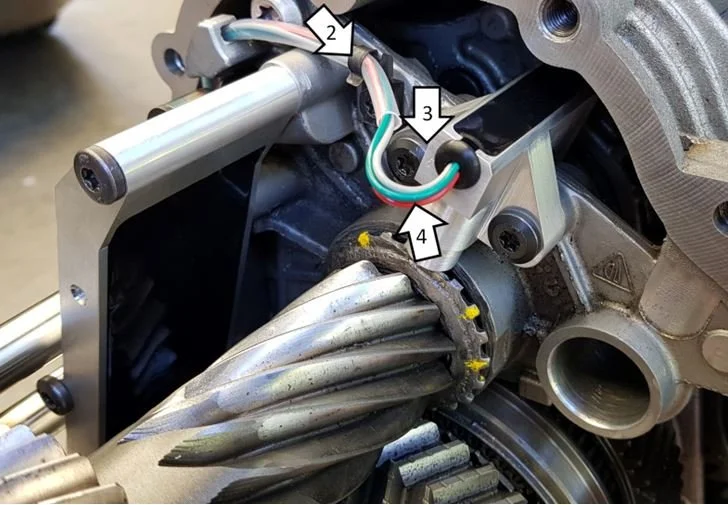
Ensure the bend radius is not too tight where the wires exit the speed sensor.

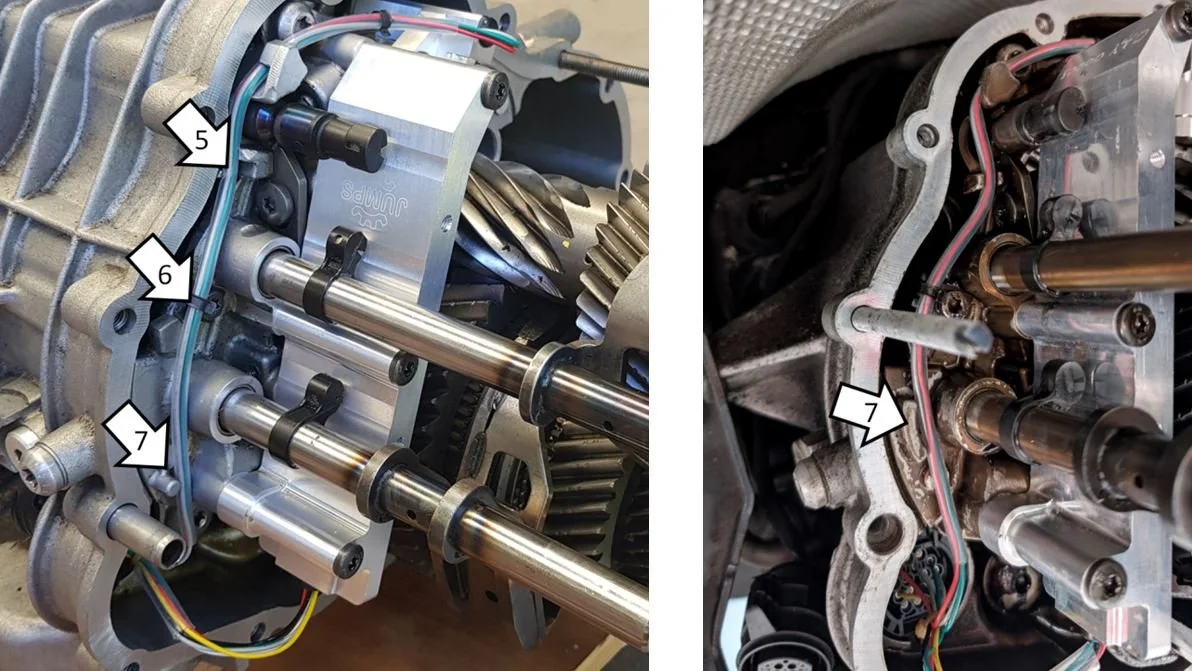
Push into the metal hooks at 5.
Push under the metal clip at position 6.
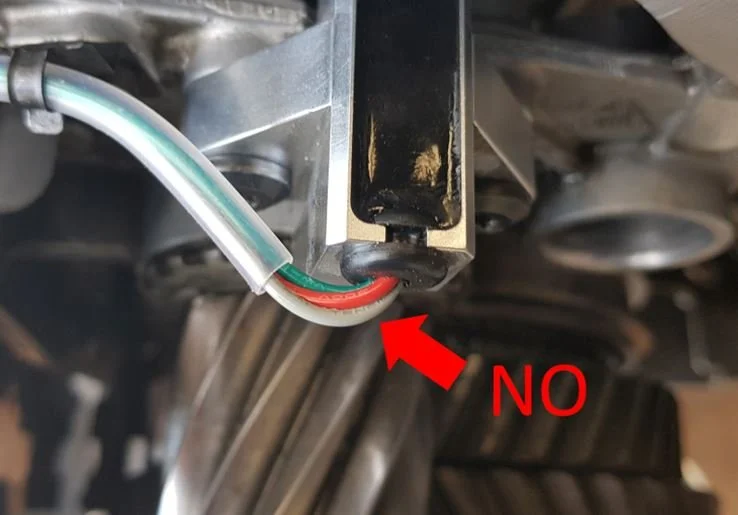
Push behind the pin at position 7. Note that in some older transmissions the pin at position 7 might be an arc shaped protrusion as shown in the right hand image below.
It is critical that the tubing is held in position 7 and doesn’t slip out, which can result in the wiring being pinched by the rear casing when installed. You may consider cleaning this area with solvent to remove the residual gear oil, which should ensure the tubing is held firmly in place. It is recommended to check the wiring harness during rear casing installation to confirm it remains located correctly.
Lightly coat the plug O-rings with oil prior to fitting.
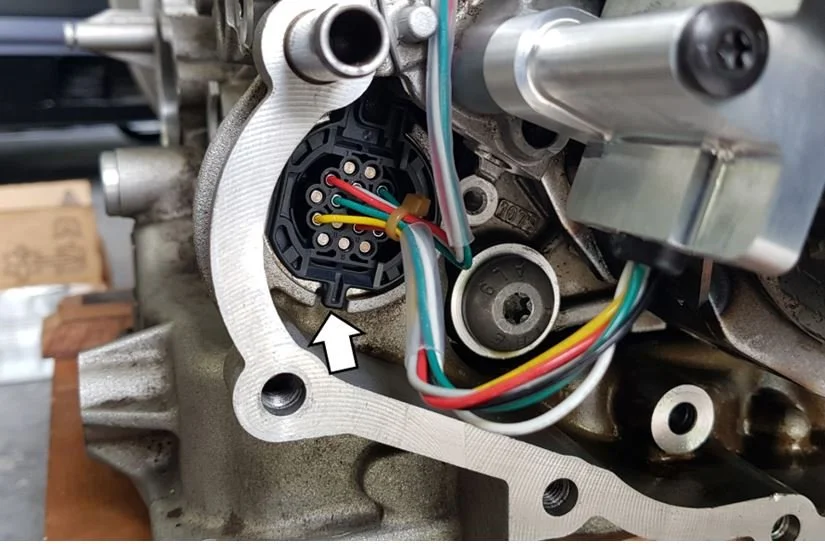
Push the plug in (position 1) clocking it to match the indentations on the case. Secure the connector by pushing the metal clip in place on the outside of the case. The wire will probably bend down like position 2.
7 - Attaching the Harness Plug
Ensure the plug is located correctly in the transmission housing indentations.
Push up and bend the wire gently in the location shown below so that the protective tube points straight back (this will ensure it will insert correctly into the rear casing when installed).
In many instances the transmission may seem to operate correctly without conducting a calibration. However, for a number of reasons relating to transmission longevity and self protection, it is essential that a calibration using PIWIS is performed.
It is only necessary to conduct the ‘Calibration without previous part replacement’ routine. This calibrates the distance sensor (the speed sensor does not need to be calibrated) without running unnecessary unrelated procedures that are prone to failure. Failure of these procedures may render the transmission unusable requiring additional troubleshooting and possible repair.
While some aftermarket tools have a calibration function, there are numerous examples of where using an aftermarket tool has wiped the TCU coding, causing significant work and expense to correct the fault. This is a known problem that can occur with any replacement sensor, and is not related to the JUMPS sensor. It seems to be more prevalent with the 987/997 platform. For this reason use of aftermarket tools for the calibration is not recommended.
8 - Calibration after sensor replacement
If you aren’t familiar with the PDK transmission, it is advised that you read the information below. Whilst some of this might seem like fundamental information, it is provided as a result of errors made when installers were not aware of some design characteristics of the PDK transmission. Some of these errors have resulted in significant damage to transmissions, and one full transmission failure that I am aware of.
There are numerous videos online that describe how the transmission is constructed, as well as how to remove the rear casing on both the 911 and Boxster/Cayman with the transmission remaining in the car. Please research thoroughly so you have the required knowledge prior to beginning the sensor installation procedure.
The JUMPS sensor is designed for the 7 speed PDK transmissions fitted to Porsche sports cars only. Compatible models are the 987, 997, 981, 991, 718 and 992 (GT3 and GT3RS only). It is not compatible with other Porsche PDK transmissions.
The JUMPS sensor is made in two versions (911 or Boxster/Cayman) to ensure the most OEM like sensor outputs. This creates a sensor that calibrates much more easily, and provides appropriate transmission self protection.
The transmission has two fluid compartments. The clutch compartment and the gear compartment. The distance and speed sensor are in the gear compartment. This requires a 75W-90 synthetic gear oil. Note this is the same compartment that has the differential.
To drain the gear compartment fully you need to remove both the drain plug rearward of the black pan and the small plug below the differential, as there are two low points in this compartment. Some early model transmissions do not have a gear oil drain below the differential, and only have a single gear oil drain point. Filling of the gear compartment is done via a single fill hole.
Images of the drain and fill locations are on the ‘Resources’ page on this website.
Important: The drain plug in the black plastic pan itself is to drain the clutch compartment. This DOES NOT drain the gear compartment. Unless you are deliberately draining the clutch section, the plug in the black plastic pan should not be removed.
The gear oil fill hole is always on the side with the differential for all transmission types.
The clutch fluid fill hole is always on the side that does not have the differential for all transmission types.
This means that when standing at the rear of the car (911, Boxster or Cayman) and looking forward, the gear oil fill is on the right side, and the clutch fluid fill is on the left side.
If when attempting to fill the gear oil you remove the fill plug and fluid gushes out, you have the wrong fill plug. You most likely have removed the clutch compartment fill plug. Stop what you are doing and find the correct fill hole.
Transmission damage, and possible failure, will occur if the incorrect fluid is installed in either compartment, or if each compartment isn’t filled correctly.