
PDK repair resources
The information in this section is provided to show what worked for me and others on our sensor design team during the many sensor changes done as part of the development process. It is not the way it must be done, but simply the methods that worked for us. It may be of assistance to some.
The sensor change is not a Porsche approved procedure. Repairs are carried out at your own risk
Video resources
Rear Case Removal. This is fundamental information and must be understood for all distance/speed sensor replacements.
Boxster/Cayman sensor replacement: Information specific to Boxster and Cayman sensor replacement, but is also applicable to the 911
991 sensor replacement: Information specific to the 991.
911 sensor replacement: Information specific to 911 sensor replacement. Please also watch video for Boxster/Cayman.
Additional essential information relating to sensor replacement
Oil cooler removal: Information relating to gear and clutch oil cooler removal.
More additional information relating to sensor replacement.
Electrical fault diagnosis: Information relating to PDK fault diagnosis
Calibrations: What is going on? What you need to know.
Draining and filling with fluids: Go to time 11:12 for clutch fluid, and 13:57 for gear fluid
How does the PDK work, Part 1: General information for the layman on how the PDK transmission works.
How does the PDK work, Part 2: More general information on how the PDK transmission works.
PDK video playlist
All of my PDK videos on Youtube
981 Boxster video playlist
All videos relating to general maintenance & repairs on the 981.
Most of these are also applicable to the 991
Drain & fill plug locations
Important repair information
It is essential that installers have a very good knowledge of the transmission and the tasks needed to be conducted. Without this there is the high likelihood of transmission damage when undertaking the repair. Installers range from workshops with decades of experience to individuals with little car repair experience.
The PDK is a very different transmission to pretty much any other. Knowledge of the transmission is essential prior to undertaking any work on it. If you aren’t intimately familiar with it, please use the videos I’ve provided and any other info you find to gain the knowledge required. The sensor change itself isn’t particularly difficult, but there are lots of little things that can bite you, and knowledge of these before you start is essential.
Rear casing gasket
The rear casing gasket is made of pressed steel. It is not available as a spare from Porsche and so must be used again. It must be installed as this sets the correct internal spacing of the shafts when the rear casing is installed.
Care must be taken when removing the rear casing to not damage the gasket. Upon install ensure that the gasket and contact surfaces are perfectly clean. I’ve never used sealant and never had a leak using the same gasket for dozens of sensor changes during sensor development.
If sealant is used and the casing needs to be removed again, this creates a lot of additional work to ensure the surfaces are clean prior to the next installation. It is not unusual for someone new to the procedure needing to remove the rear casing multiple times to successfully have the rear casing installed. Removing sealant each time adds additional effort.
Oil Cooler O-rings and Gasket
I have not replaced these during sensor installation and never had leaks. However, it has been reported to me on one occasion of coolant leaking when the large formed gear oil cooler gasket wasn’t replaced.
End Caps
I’ve never replaced the large black end caps. For most installations, each cap is comprised of two pieces, an inner plastic piece which is pressed into the outer rubber coated metal cap. For some transmissions the inner plastic piece is loose and not pushed into the outer cap. If careful when removing the cap the inner plastic piece doesn’t get damaged. I use a hammer and suitable tool to reset the shape of the cap after removal, and then fill the hole with RTV sealant. I’ve never had leaks afterwards when using this method.
Replacement caps are available from Porsche if you need then.
Screw replacement
The aluminium screws used on the rear casing and gear oil cooler are permanently deformed when installed, and so must be replaced after each use. When new aluminium screws are used, they need to be torqued using a very low range torque wrench. Also, if these need to be removed for some reason during the procedure, they need replacing again.
I prefer to use steel screws that can be used multiple times without issue. The specification of screws I use are listed below:
All are class 8.8 steel zinc plated.
M8 x 50 (16, casing perimeter), M8 x 60 (1, casing gear idler shaft)
Boxster/Cayman: M6 x 55 (2), M6 x 32 (3), M6 x 20 (3). All for gear oil cooler.
911: M6 x 55 (3), M6 x 20 (3). All for gear oil cooler.
Washers on all screws, except if able to source flange head screws, where washers are not required.
Torques: M8: 15 Nm + thread locker, M6: 6 Nm + thread locker
When using standard torques for these class screws, which are a little more that what I’ve listed above, I’ve had one instance of a stripping a casing thread. Hence why I use a lower torque than standard and use thread locker to ensure the screw doesn’t back out.
Fluids
(from the ZF lubricant list)
Many fluid manufactures make suitable fluids. Look for the specification or Porsche part number to confirm compatibility. I use a locally made Australian fluid, but I know that many workshops use Motul fluids successfully.
1. Clutch section
Fuchs Titan FFL-3 (Full capacity = 5.3L)
ZF Oil No. 0671.090.534 (ZF LifeguardFluid 7.3 DCT)
Porsche Oil No. 999.917.080.00
2. Gear section. This is where the distance and speed sensor is installed.
ExxonMobil Mobilube PTX 75W-90 (Full capacity = 2.9L if gear oil cooler fitted)
Porsche Oil No. 999.917.067.00 or
Porsche Oil No. 999.917.090.00
Fluid filling: It is critical that the transmission is filled with fluid correctly. Transmission damage or failure will rapidly occur if the correct fluid is not installed to the correct level in the correct chamber.
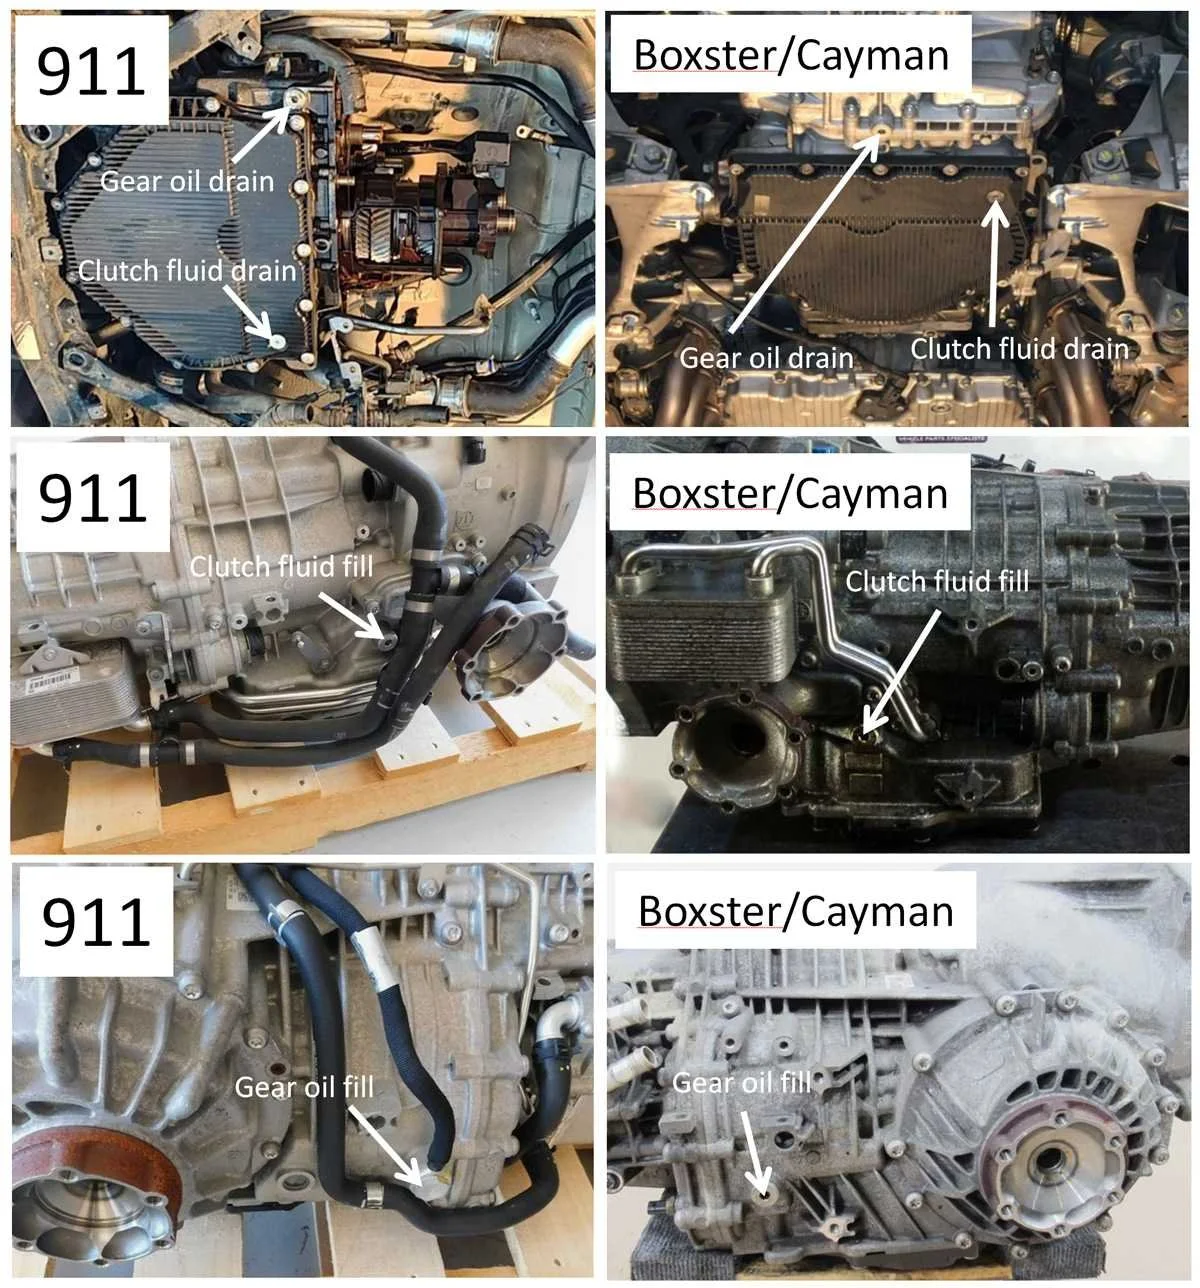
Watch the servicing video linked above for how to fill correctly. Note that the plug positions of the 911 and Boxster/Cayman are different due to the transmissions being a mirror image of each other. The drain and fill procedure is the same. See provided image of the drain and fill ports.
Clutch fluid: One drain which is the plug in the black pan. A single fill port on the side that does not have the differential for both transmission types.
Note the clutch fluid fill plug is the large one near to the driveshaft. It’s not the smaller hex plug (but similar looking) that is just forward of the seam between the rear casing and main casing. If you remove this plug you will find it’s a long funny shape with a hole through the length of it. Do not attempt to fill using this port as it’s a weep hole for the internal seals on the two input shafts.
When draining by simply removing the drain plug, 2.5 - 3L of the total 5.3L total capacity will be drained.
Gear oil: Two drains. One main drain and another smaller drain plug under the differential. Early transmissions don’t have the smaller drain under the differential.
911 main drain is rearward and left of the black pan (not the one in the pan). The Boxster/Cayman main drain is centrally located in the rear casing. The fill port is always on the side of the differential for both transmission types. It is the large plug that is just forward of the seam between the rear casing and main casing.
When draining by removing both drain plugs (if fitted), approximately 2.4L of the 2.9L total capacity will be drained.
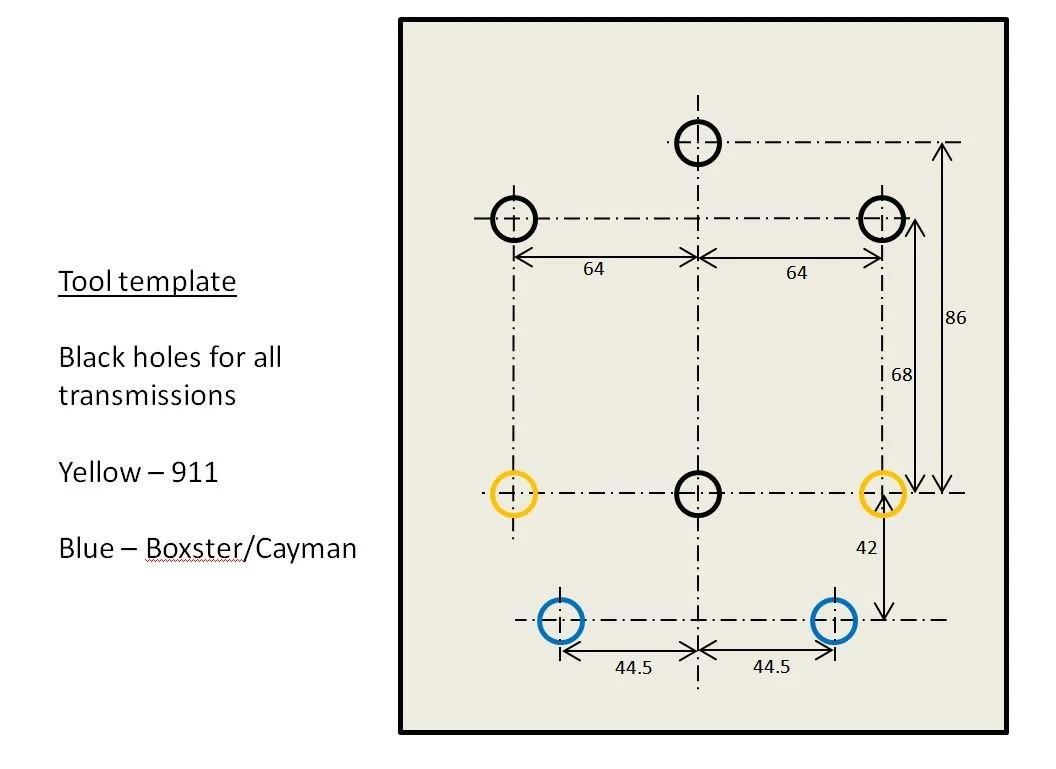
Here is the template for the casing removal tool that can be made yourself. It is what I use in the videos.
Metal plate: Minimum 10mm steel. Aluminium will bend too much. One of the major complaints I get from people using the bought tools is the lack of strength in the steel plate.
Outer holes for standoffs that thread into rear casing: M10 × 1.5mm x approx 150mm long.
Inner holes for threaded bar that pushes on shafts: I use M12 to have sufficient strength. I would suggest M10 at a minimum. Approx 200mm long.
The length of the threaded bars can be shortened depending on the application. Boxster/Cayman tools don’t need to be as long. The 911 needs to be longer, especially for the AWD transmission.
Portion of plate steel outside of the holes isn’t required. You can cut this down to minimise the size, which will make it easier where room is tight, especially the 911.