PDK Speed sensor faults
How does the PDK speed sensor work?
Refer to the image below, which is a very simplified description of what is happening.
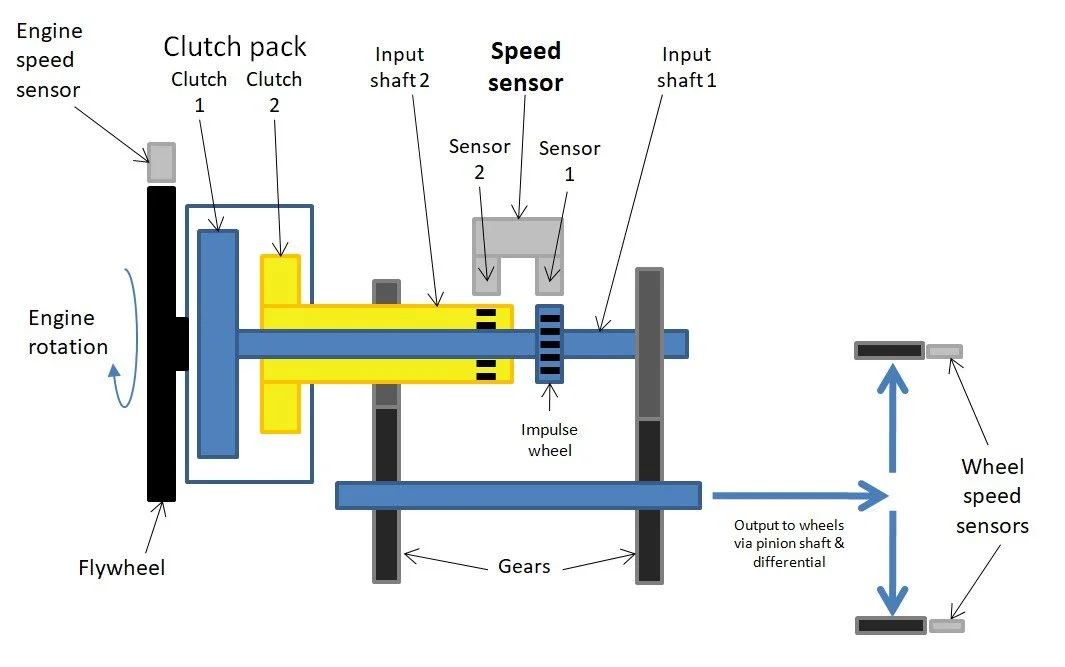
The transmission has two input shafts, with each connected to a clutch. The engine flywheel is directly connected to the clutch pack input, so the clutch input is measured by the engine speed sensor (crankshaft position sensor). The clutch outputs are measured by the speed sensor. For this reason, I find it more logical to think of the speed sensors as “clutch output sensors” rather than input speed sensors.
Speed sensor channel 1 detects the speed of a notched impulse wheel that is pressed onto shaft 1.
Speed sensor channel 2 detects the speed of the individual gear teeth that are on shaft 2.
Clutch slippage is determined by a comparison of engine speed to transmission speed provided by the speed sensor. If a clutch is fully clamped, engine speed should equal transmission speed for that transmission shaft.
The output from the transmission is measured by an average of the wheel speed sensors. Depending on the gear engaged, the TCU knows exactly what wheel speed should be detected when compared to the speed sensor output. This is called “gear ratio monitoring” and is constantly being checked by the TCU during all operations. Due to pre-selection of a gear on the non-engaged clutch, both shaft speeds can be monitored at the same time, not just the shaft with the engaged clutch.
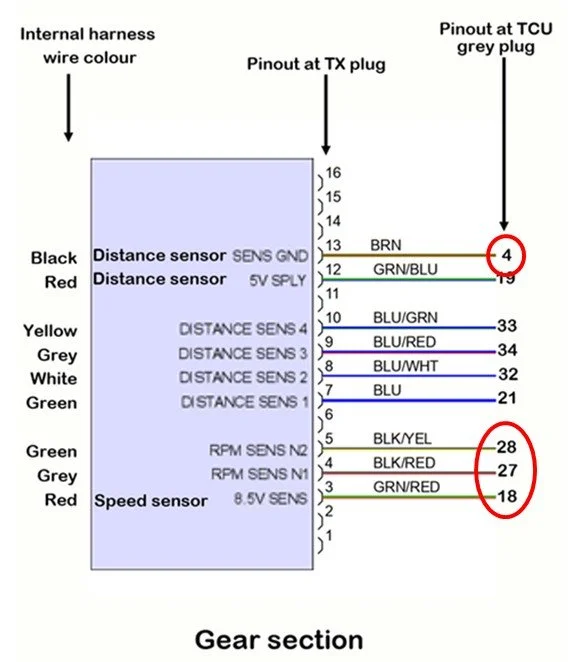
The speed sensor uses an 8.5V supply from the TCU. It is the only transmission sensor that uses this 8.5V source. Both speed sensor channels receive the same 8.5V supply, and have an individual output that reports to the TCU.
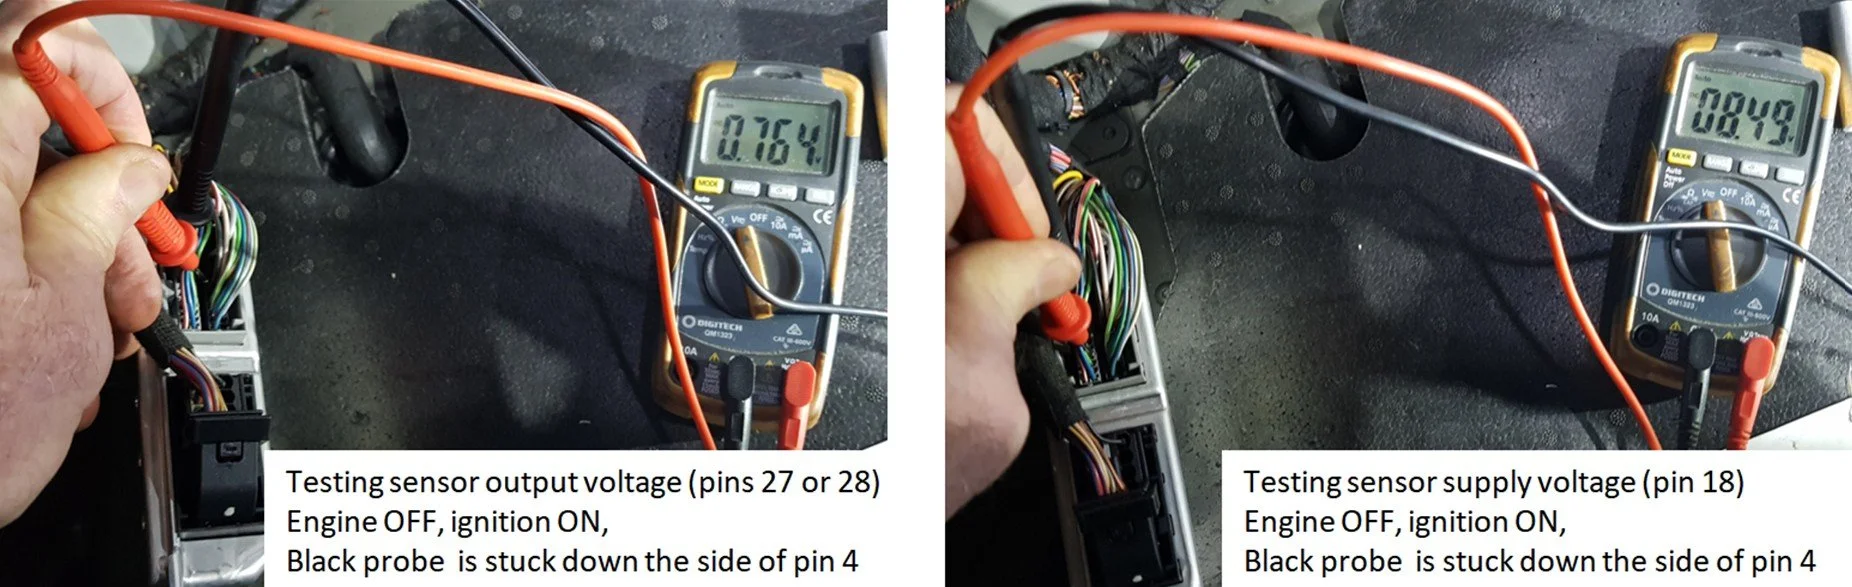
When the TCU has electrical power applied (ignition turned on), each speed sensor channel will send a baseline voltage back to the TCU of approximately 0.75V. This allows the TCU to determine if the speed sensor is online and working.
When the shaft rotates, the individual speed sensor will detect each tooth that passes and sends a small pulse to the TCU. These are counted by the TCU to determine the shaft speed. The pulse sits on top of the baseline 0.75V voltage that is constantly being sent to by the sensor. In this way the TCU can detect if the speed sensor is online, and also detect speed.
PIWIS gives an output of RPM for each shaft, but the TCU is counting these individual pulses to determine shaft speed.
What are correct sensor outputs?
I often get questions about correct speed sensor outputs. Here are the basics of what should be observed if all is OK.
When a gear is engaged on an input shaft, that shaft is now locked to the rear wheels. So if the car isn’t moving the speed should be zero.
If there is no gear engaged then the input shaft can turn. Even though the clutch isn’t engaged, the residual drag in the clutch will allow the shaft to turn at a speed slower than engine RPM. The speed it turns relative to engine RPM is determined by a lot of factors, and will increase with transmission temperature increase. The clutch fluid temp makes a small difference, but the gear section temperature much more. As soon as the gear section warms and the gear fluid will become much less viscous and allow the shafts to be dragged around by the open clutch much more easily.
Here are some examples:
P selected: 1st gear is engaged on shaft 1 (earlier software 987/997 will have reverse gear engaged). In this case, shaft 1 should show a speed of zero, and shaft 2 will be turning slower than engine RPM.
R selected: The same indication as for when P is selected.
N selected: No gear is engaged so both shafts will turn at a speed slower than engine RPM.
D selected: 1st (shaft 1) and 2nd (shaft 2) are engaged, so both shafts are locked to the rear wheels, and will show a speed of zero.
On my test car the speed sensor outputs are approximately 100 RPM when cold and about 500 RPM when warm when a gear isn’t engaged at idle. Every transmission will be different so don’t use these numbers as expected values. They are just indicative of the differences you might see between cold and warm.
It’s possible to lift the car and drive with the wheels moving like driving on the road. In this case the transmission speeds will show rotation. The shaft with the engaged clutch should show a speed equal to the engine RPM. The shaft with the non-engaged clutch but a gear pre-selected should show a different speed that is the gear ratio difference between the gears engaged on the two shafts.
Testing the speed sensor outputs are correct
This is surprisingly easy. Go through the following method to turn one rear wheel by hand and observe both speed sensor outputs in PIWIS.
Lift car off the ground so both wheels can rotate freely. Park brake off.
Connect PIWIS but leave at the top level showing all the control units.
Start engine, select D and then stop engine. Leave gear lever in D. Turn key back on but don’t start engine.
1st gear should remain engaged on shaft 1 and 2nd gear on shaft 2.
In PIWIS, now go to the transmission outputs and observe the shift rod positions. Shift rod 3 and 4 should show approximately +8mm, which will confirm that 1st and 2nd gear are engaged inside the transmission.
Observe both speed sensor outputs in PIWIS. Both should be zero.
To observe the input shafts turning you now need to turn the rear wheel. With an open differential this will have the effect of turning the other wheel in the opposite direction. To keep this from moving either have someone hold it or I prefer to slot a small screwdriver in the caliper down into the cooling vents of the brake rotor. In this way the wheel can’t turn when you turn the other wheel to test the speed sensor outputs.
Now fit the standard tool that you would use to remove the wheel studs. Use this to turn the wheel. It should turn freely with little resistance due to both clutches being open. The warmer the transmission the more freely it will turn. I would suggest turning the right wheel as this will tighten the stud rather than the left wheel where it will want to release it.
I find that turning at a rate of 1 full wheel rotation every two seconds is easy to attain by hand. Use a timer to get the cadence and turn 180 deg every second. This is a wheel rotation rate of approximately 30 RPM
With the wheel rotation rate of 30 RPM and the opposite wheel not turning, the speed sensor outputs should be approximately 200 RPM for shaft 1 and 120 RPM for shaft 2.
Once the test is finished, select the gear lever to P and start the engine. Shift rod 4 should immediately disengage 2nd gear and move to a distance of approximately 0mm. Ensure you remove the screwdriver from the caliper if you have done this.
If you have the rear casing removed you can use the method above but you will need to physically move the shift rods to engage 1st and 2nd. 1st is easy, just push shift rod 3 towards the engine. 2nd is a bit more difficult as you need to push shift rod 4 toward the engine. Don’t push the end of shift rod 4. Use a long screwdriver or similar to gently push the shift fork to the correct position.
Measuring the raw speed sensor output with an oscilloscope
If you are concerned the speed sensor output is being misinterpreted by the TCU, it’s possible to measure the speed sensor output directly using an oscilloscope. Follow the procedure below.
Oscilloscope setup: Trigger = Edge. Trigger value = 1.0V.
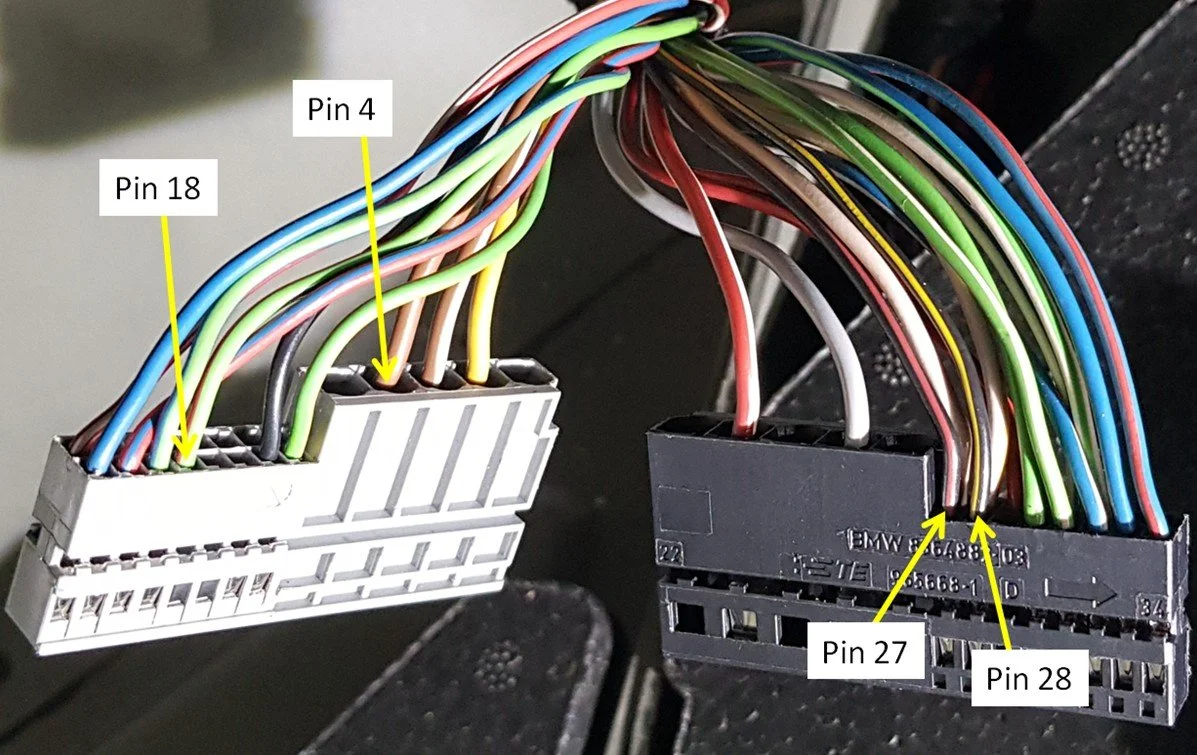
Probe pin 27 or 28 (see images below). Ground to car chassis.
Multiply observed frequency in Hz by 2.7 to get correct RPM, which is what you should observe in PIWIS. eg. 100 Hz = 270 RPM.
Note that the #2 sensor is measuring the 2nd gear teeth. There seems to be some variation in the number of 2nd gear teeth depending on the transmission. My 981 Cayman GTS bench transmission has 23 teeth, but I’ve seen documents showing other transmissions having 21. The shaft 1 impulse wheel as 22 teeth. Multiplying the observed frequency by 2.7 is going to be an approximate value for both shaft 1 and shaft 2 and will show if the TCU interpretation is significantly different.
There are many speed sensor faults. Some are obvious this is where the fault lies, and some require knowledge and testing to determine if the fault is the sensor or elsewhere.
Speed sensor faults
As discussed above, the speed sensor outputs are constantly being compared to wheel speeds to check if this is correct. If the wheel speed sensors are failing and causing the fault, you would expect to get PSM faults related to the wheel speed sensors. Without this the cause can be the speed sensor.
0731, 0732 Gear ratio monitoring
1743, 1744 Transmission input shaft speed plausibility check
This is where the engine speed is checked against the speed sensor outputs. If this is out of limits it may be due to the speed sensor reporting the speed incorrectly.
There are many of these faults so I won’t attempt to list them. 1745, 1757, 1758, 17B5-8 are examples. In this case there may be clutch slippage occurring, which is causing the fault. Observation of engine RPM while driving is often a reliable method of determining if slippage is occurring or not. If there is no slippage observed, the fault is often a failing speed sensor.
Clutch slippage and clutch overspeed faults
Whilst this seems strange, a failing speed sensor often comes with clutch fluid over-temperature faults.
The over-temperature fault has two possible reasons that can cause the fault to trigger.
1. Actual fluid temperature is too hot.
2. A calculation of the clutch steel disk temperatures indicates these are too hot.
If a speed sensor channel is giving erroneous outputs then the TCU will think there is significant clutch slippage, and then calculate an over-temperature of the clutch disks. This over-temperature isn’t occurring and is simply a result of the failing speed sensor.
If you get the over-temperature faults, check the clutch fluid temperature and other indications of clutch slippage. If these are normal, then the fault is most likely from a speed sensor that is incorrectly reporting the speed, especially if accompanied by some other speed sensor fault.
Clutch fluid over-temperature faults
As discussed above, the speed sensor will constantly send a 0.75V baseline voltage, with the detected pulse sitting on top of this. If the TCU detects an output voltage below 0.15V, or above 4.5V, this error type will occur. This is normally due to a failing speed sensor or wiring problem.
Due to way the speed sensor wires are routed, it is easy to have a wire caught and damaged when installing the rear casing in the sensor change procedure. If one of the sensor output wires is damaged and makes electrical contact the transmission casing, this drags the output voltage low and flags the error. If the voltage supply wire is damaged and contacts the casing, this will lower the 8.5V supply low and flag a 1707 code.
Speed sensor voltage faults. 173B, 173C, 173D, 173E
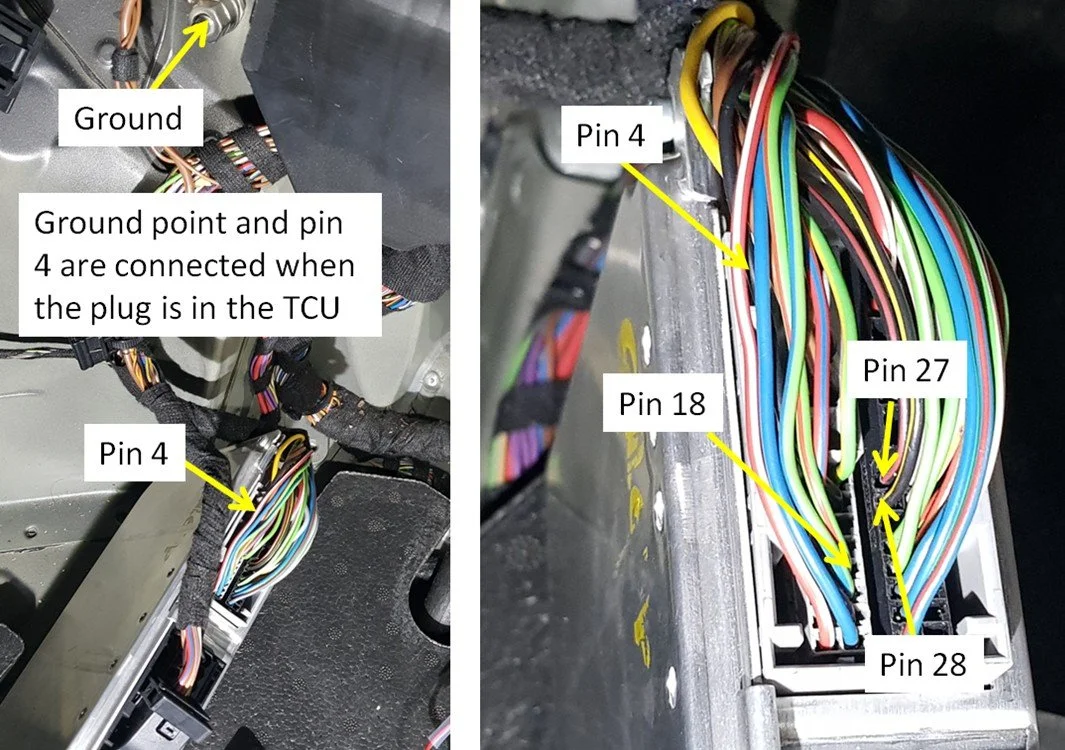
It is possible to test the speed sensor voltages at the TCU. Remove the shroud around the grey plug to reveal the two separate pin housings inside. Then carefully insert these back into the TCU. Turn the ignition on and back probe for the voltages.
Note that the chassis ground is the same as pin 4 (distance sensor ground). Pin 4 goes directly through the TCU to the chassis ground.